How to Connect Fans to a Motherboard
Proper airflow inside your PC is critical for keeping temperatures low and ensuring your system runs smoothly. One key component of achieving this is knowing how to connect your case fans to the motherboard correctly. Whether you’re assembling a new build or upgrading your current rig, understanding how fan connectors work, where they go, and how to control them can make a big difference in performance and noise levels.
Identifying Fan Connectors
Before you start plugging anything in, it’s important to understand the two main types of fan connectors:
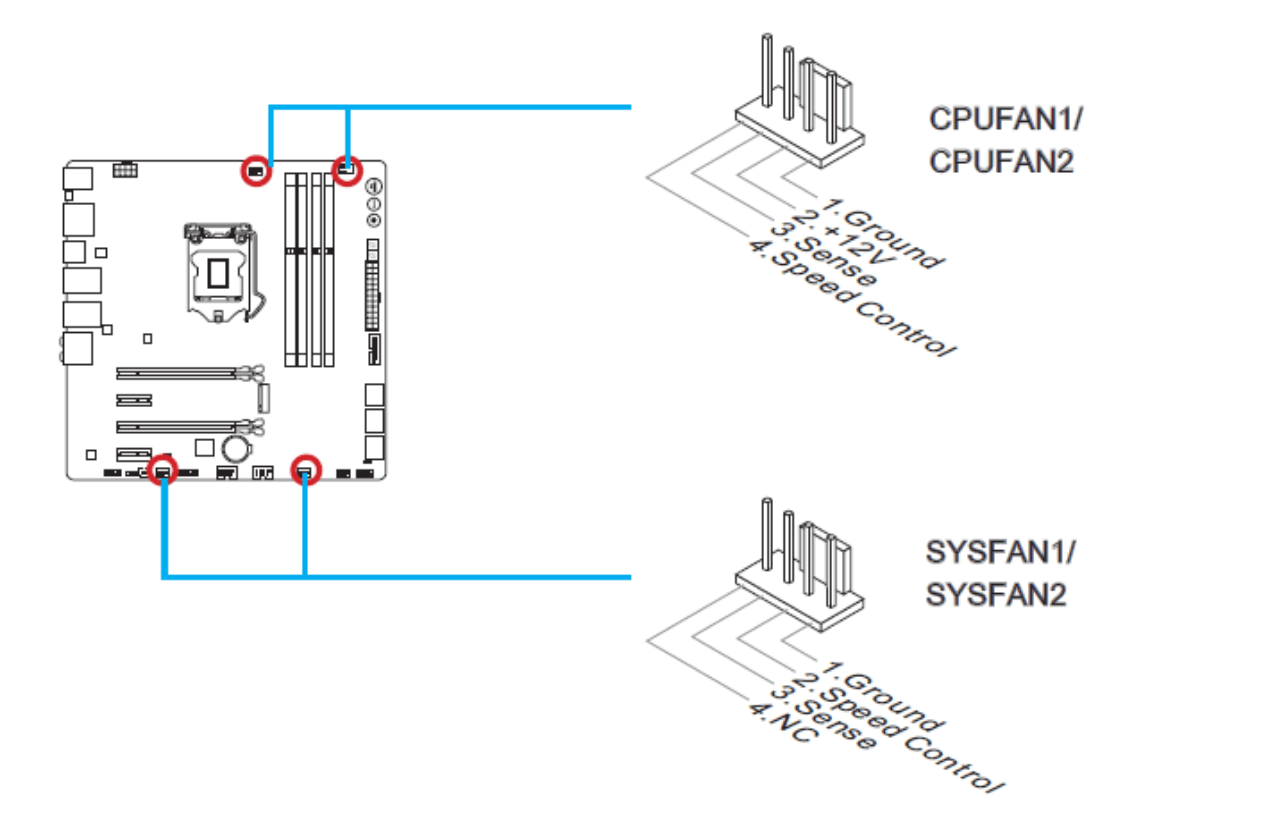
- 3-Pin Fan Connectors: These have three wires—one for power (12V), one for ground, and one for a tachometer signal that reports fan speed. They provide basic speed control based on voltage but don’t allow for fine-tuned adjustments.
- 4-Pin Fan Connectors: These include an extra wire for Pulse Width Modulation (PWM) control. PWM allows your motherboard to dynamically adjust fan speed based on temperature, making these fans more efficient and quieter under light loads.
The good news is that you can plug a 3-pin fan into a 4-pin header and vice versa without causing any damage. You just won’t have access to PWM control if you’re using a 3-pin fan.
Locating Fan Headers on the Motherboard
Next, you need to find where the fans actually connect. Motherboards typically have several fan headers, often labeled:
- CPU_FAN: For the CPU cooler’s fan(s).
- CHA_FAN or SYS_FAN: For chassis or system fans.
Refer to your motherboard’s manual for a diagram showing where each header is located. They’re usually easy to spot, with labels printed directly on the board.
Connecting the Fans
Once you’ve located the headers:
- Align the Connector: Each fan connector has a notch or guide to ensure proper alignment with the motherboard’s header.
- Attach the Fan Plug: Gently press the connector down until it’s fully seated. Avoid forcing it—if it doesn’t slide in easily, double-check the orientation.
Handling Multiple Fans
Most motherboards come with a limited number of fan headers. If you have more fans than available headers, you have a few options:
- Fan Splitters: These allow you to connect two or more fans to a single header. Just be careful not to exceed the header’s maximum power output—check your motherboard specs for limits.
- Fan Hubs: Powered by a SATA or Molex connector from your power supply, fan hubs can manage several fans independently without overloading the motherboard.
Alternative Power: Molex Connectors
Some fans come with Molex connectors, which connect directly to your power supply. While this guarantees power, the downside is they’ll run at a constant speed without any control from the motherboard. This setup might be fine for non-critical airflow but isn’t ideal if you want quieter or more dynamic cooling.
Configuring Fan Settings in BIOS/UEFI
After your fans are connected:
- Enter BIOS/UEFI: On startup, press the designated key (commonly Delete or F2) to enter BIOS.
- Find the Fan Control Settings: Look for sections labeled Hardware Monitor, Fan Control, or something similar.
- Adjust Fan Profiles: Most BIOS setups offer predefined profiles like Silent, Standard, and Performance or allow you to create custom fan curves based on temperature sensors.
Cable Management and Maintenance
Proper cable management isn’t just for aesthetics. Keeping fan cables tidy ensures they don’t obstruct airflow or get caught in spinning blades. Use zip ties or cable channels to keep everything neat.
Additionally, regularly clean your fans to remove dust buildup, which can reduce airflow efficiency and increase noise levels.
Summing Up
Connecting fans to your motherboard isn’t complicated, but doing it properly ensures you’re getting the most out of your cooling setup. By understanding fan connectors, locating headers, and configuring settings in BIOS, you’ll keep your PC running cooler, quieter, and more efficiently.
Your Trust, Our Core Commitment
At Rising Tech, earning and maintaining your trust is the cornerstone of our mission. We're dedicated to transparency, impartiality, and the relentless pursuit of truth in every article, review, and recommendation we publish. Our commitment to these principles ensures that you, our valued reader, are always equipped with reliable and unbiased information. Let us be your trusted guide in the ever-evolving world of technology.